Crispy Garlic Butter Chicken Thighs (30-Minute Weeknight Brain Bowl)
I made this on a Tuesday when my anxiety was running about a 6 out of 10 and I had exactly zero interest in doing anything complicated.
I made this on a Tuesday when my anxiety was running about a 6 out of 10 and I had exactly zero interest in doing anything complicated. But here’s the thing about garlic butter chicken thighs — they look and taste like you tried really hard, and they take about 30 minutes. That combination is basically a love language.
Now, the science nerd in me needs to explain why this recipe earns a spot on Mood Fuel. Chicken thighs are genuinely one of the better mood-supporting proteins you can eat on a weeknight. They’re rich in tryptophan, the amino acid your body converts into serotonin, and they’re loaded with B vitamins — B6 especially, which plays a direct role in neurotransmitter synthesis. The garlic isn’t just flavor either. Allicin, the active compound in fresh garlic, has been shown in several studies to have anti-inflammatory and even neuroprotective properties. Your dinner is working harder than you think.
The butter is real butter, by the way. I’m not going to apologize for it. Fat — especially from whole food sources like grass-fed butter — supports the absorption of fat-soluble vitamins and provides the fatty acids your brain uses to maintain cell membrane integrity. We don’t do guilt here. We do delicious dinners that happen to support how you feel.
My eomma would not recognize this dish. She’d probably serve it over three cups of rice and call it bom-bap — food that makes you strong. She’s not wrong. This one’s for the hard Tuesdays.
Ingredients
- 4 bone-in, skin-on chicken thighs (about 2 lbs total)
- 1 tsp kosher salt
- 1/2 tsp freshly ground black pepper
- 1/2 tsp smoked paprika
- 1/4 tsp garlic powder
- 1 tbsp avocado oil or neutral high-heat oil
- 3 tbsp grass-fed unsalted butter, divided
- 6 cloves garlic, minced (about 2 tbsp) — don’t skimp here
- 1 tsp fresh thyme leaves (or 1/2 tsp dried)
- 1 tbsp fresh flat-leaf parsley, roughly chopped, for finishing
- 1/2 tsp lemon zest (optional but recommended — brightens everything)
- 1 tsp fresh lemon juice, for finishing
Instructions
-
- Pull the chicken thighs out of the refrigerator about 15 minutes before you start cooking. Bringing them closer to room temperature helps them cook more evenly — you’ll get that crispy skin all the way to the edges instead of pale patches around the bone.
-
- Pat the chicken thighs completely dry with paper towels. This is the single most important step for crispy skin. Any surface moisture will steam the skin instead of crisping it. Don’t skip this.
-
- In a small bowl, mix together the salt, black pepper, smoked paprika, and garlic powder. Season the chicken thighs all over, getting under the skin where you can. The skin side gets the most seasoning.
-
- Heat a large oven-safe skillet (cast iron is ideal) over medium-high heat for about 2 minutes until it’s genuinely hot. Add the avocado oil and swirl to coat. You want the pan properly hot before the chicken goes in — this is what starts the crisping process.
-
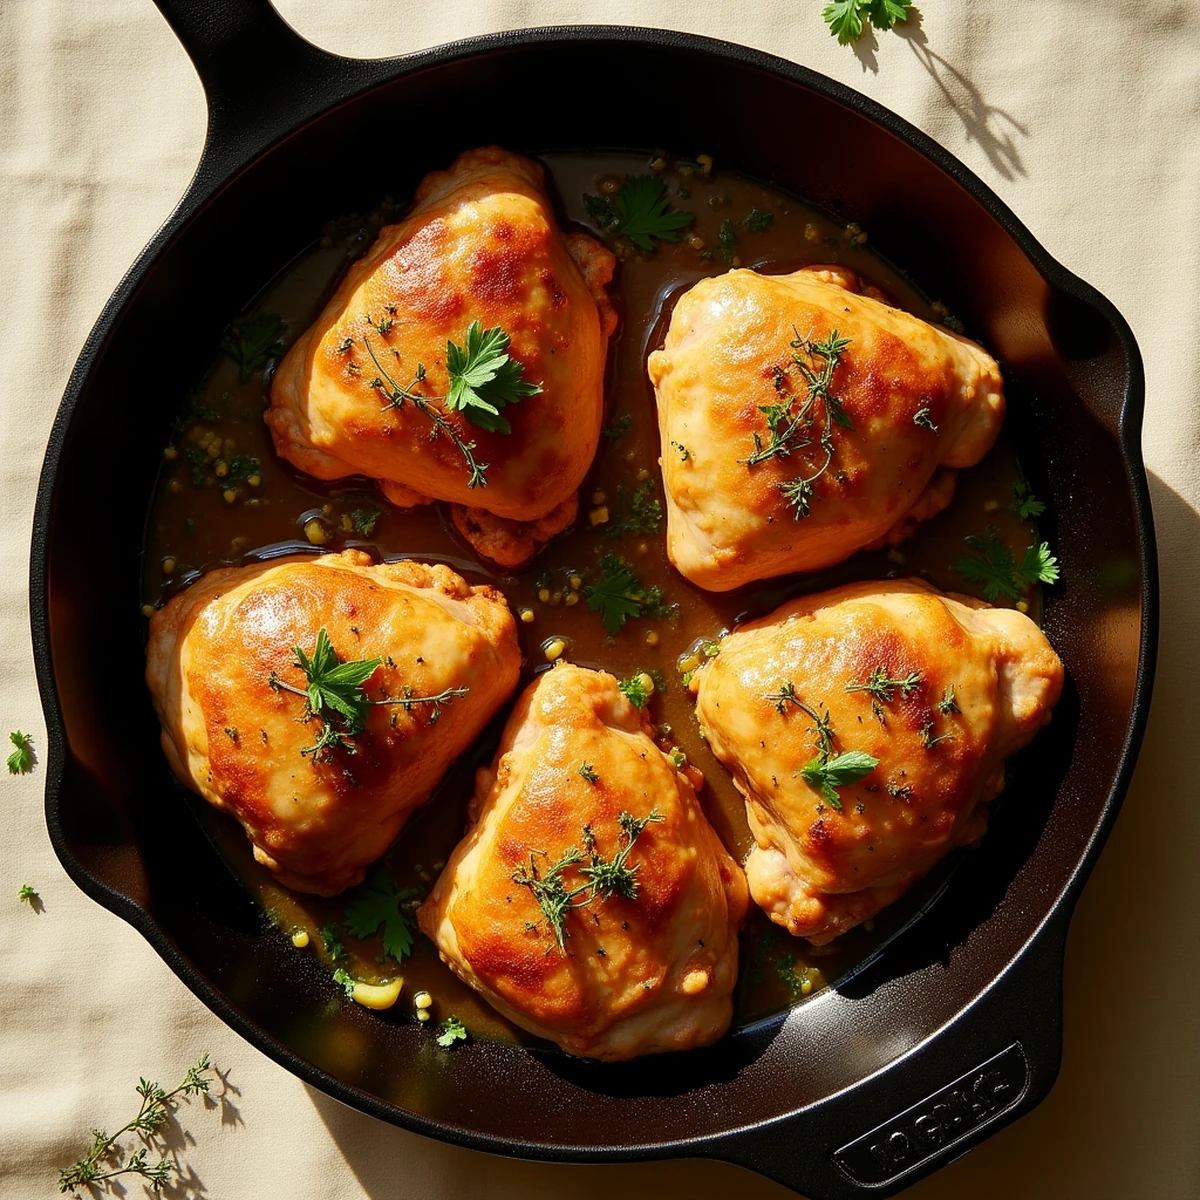
- Place the chicken thighs skin-side down in the skillet. Do not move them. Do not adjust them. Let them cook undisturbed for 12 to 14 minutes over medium heat. You’ll hear aggressive sizzling at first that calms to a steady, satisfied sizzle. The skin is done when it releases easily from the pan and is deep golden-brown. If it’s sticking, it’s not ready yet.
-
- While the chicken is searing skin-side down, preheat your oven to 400°F (205°C).
-
- Flip the chicken thighs. They should release cleanly and the skin should look like a magazine photo. Cook the second side for 2 minutes on the stovetop, then transfer the entire skillet to the preheated oven.
-
- Roast for 10 to 12 minutes, until the internal temperature reaches 165°F at the thickest part (away from the bone). The skin will continue crisping in the oven’s dry heat.
-
- Remove the skillet from the oven. Transfer the chicken thighs to a plate and tent loosely with foil to rest. Pour off all but about 1 tablespoon of the rendered fat from the skillet (save it — it’s liquid gold for roasting vegetables).
-
- Return the skillet to medium-low heat on the stovetop. Add 2 tablespoons of butter and let it melt. Add the minced garlic and thyme. Cook, stirring constantly, for about 60 to 90 seconds until the garlic is fragrant and just turning golden. Watch this closely — garlic goes from golden to burnt in seconds, and burnt garlic is bitter. The goal is nutty and fragrant, not dark.
-
- Add the remaining 1 tablespoon of butter, the lemon zest if using, and the lemon juice. Stir together and let the sauce bubble for 30 seconds. It will be glossy and smell incredible.
-
- Nestle the rested chicken thighs back into the skillet, skin-side up. Spoon the garlic butter over the top of each piece — not over the skin (that would soften it), just around the base and over the meat where the skin is pulled back. Finish with the fresh parsley.
-
- Serve immediately, directly from the skillet. Spoon any extra garlic butter sauce over each plate. Goes beautifully over brown rice, roasted sweet potatoes, or wilted greens.
Nutrition
Tips
1. The dry skin rule is non-negotiable. I know I said it in the instructions but I’m saying it again because it’s that important. Wet skin = steamed skin = sad rubbery skin. Pat those thighs like you mean it. I sometimes leave them uncovered on a wire rack in the fridge for 30 minutes before cooking if I’m being really intentional about crispiness. The air-drying in the fridge accelerates moisture evaporation. On a hard weeknight, paper towels and 15 minutes is enough. But the fridge trick is worth knowing.
2. Add spinach or kale to the garlic butter sauce for a mood-food upgrade. Right after you add the garlic, throw in 2 big handfuls of dark leafy greens and let them wilt into the butter before you finish the sauce. You’ll get folate, magnesium, and iron folded into every spoonful — three of the nutrients most consistently linked to mood regulation. The garlic butter makes any vegetable taste like it was meant to be eaten. This is how I get my brain nutrients on a Tuesday without making a separate side dish.
3. Use the rendered chicken fat. When you pour it off the skillet in step 9, don’t throw it away. It keeps in a jar in the fridge for up to two weeks and makes the best roasted vegetables you’ve ever had. Roasting sweet potatoes or broccoli in chicken fat for a future meal is one of those small kitchen decisions that makes dinner feel a little more special. My therapist would call this ‘planning ahead for your future self.’ I call it ’not wasting really good fat.’ Same thing.